Resources
Add User to Your Website
How to add a user to your Squarespace website
If someone on your team is going to be making website edits, add them as a contributor so they have their own login info. It’s easy and more secure than sharing login information between people.
Invite Contributor
Go to “Settings”
Gear icon at the bottom of the menu
Click “Permissions & Ownership”
Click “Invite Contributor”
Enter the name and email address of the contributor
The invitation will be sent to the email address you enter here
Select the permissions
Administrator = full access
Billing = can change billing info and settings
Website Editor = can edit content but cannot add new pages or change style settingsIf you’re not sure what to pick, go with Website Editor. You can always go back and change permission levels later if you need to change access.
If you are using commerce, campaigns, or scheduling with your website, you will need to toggle on access for those tools individually.
Click “Invite”
Unlimited Users on Business Plan and Above
If you are on the Personal plan, you can only have 2 contributors. On any other plan you can add unlimited contributors. If I built your website, you are on the Business plan or above.
Finding Menu Items
Squarespace sometimes moves menu items around and changes menu titles. So, if you don’t see the specific items I mentioned, use this trick to find permissions:
Press “/” on your keyboard to pull up a search bar, then type “permissions.”
This is a great shortcut to quickly find the settings you need!
Related Squarespace Help Articles
How to Create a Social Media Links Page in Squarespace
Create your own Linktree-style page directly on your website.
Setup the Page
Create a new unlinked page. I like to call it “Links” or ”Links Page” and make the url slug: /links.
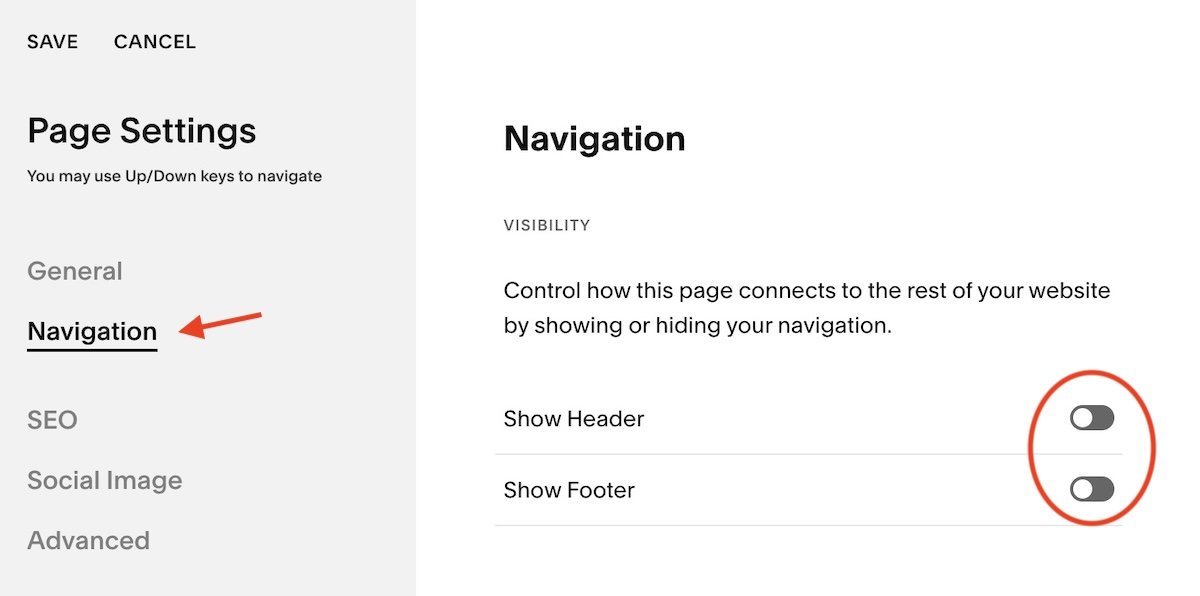
Remove the header and footer. On version 7.1 of Squarespace, you can do this super easily, without any code. Go to Page Settings (click the gear icon next to the page name)
Click the gear icon next to the page title to open Page Settings
Toggle off Header and Footer under Navigation in Page Settings. Click Save in the top left corner.
Add Content
Center align everything.
3. Create a Mini Header
We’re going to create a mini-Header just for this page.
Add an image block to the top and add either a photo of you or the logo of the company, depending what make sense for your site. Tip: Link this photo to the homepage.
Add a text block. Put the name of the website/company. You can also add a short description, or the tagline. Tip: Use a text block, paragraph 2 style.
Add some combination of link to the website, social links block, or email address. The exact combo will depend on your specific site and how you think visitors will interact with this page.
For example, if the the main social media platform the company uses is Instagram, I’m assuming most people are going to get to this Links page from instagram, and therefore would not be interested in the link to the company instagram page right away, since they just came from there. So in that case, I would put the social links block at the bottom rather than the top.
4. Add Buttons
Add buttons for every link you want to include. Add links, and set to fill. I like to turn off “open in new tab” for these.
Aim for no more than 4-6 links.
You might want to include links to things like: services page, books page, latest blog post, current book/offering/workshop, newsletter sign up, contact form or email link, link to purchase tickets, link to make reservations, youtube or podcast link, etc.
5. Optional: Add mini-footer. Depending on the site, I might put a link to the website, the social links block again. If it’s an author, I put their most recent book covers and link them to Amazon or another platform to purchase.
6. Edit in Mobile View. Most people will be looking at this page on a mobile device, so your focus should be on the mobile view. But you also want to check the desktop view and make sure that still looks good in case someone ends up there.
7. Publish and put the link in your bio!
Click to view examples of links pages I’ve created:


